Wednesday, October 26, 2011

Vintage Dresser Redo

So I finally finished painting one of Bryn's vintage dressers. Here are some 'before' shots, and some after shots!

Here you get to admire the lovely mustard brown color (I was hoping that they would be solid wood without a veneer so that I could sand them down and stain them, but no such luck)

I am very happy with how it turned out. I considered putting clear drawer pulls on, to make them more modern and feminine, but in the end I ended up liking the look of them sprayed in oil rubbed bronze (So, needless to say, I'm very glad that I worked so hard to get all the tarnish off, live and learn I guess). I'm hoping to do more work on her room so that I can 'unveil' it soon.

Saturday, October 22, 2011

Feeling Like an Idiot Keeps You Humble

So, after trying and failing to spray paint several different things (a small/old bookcase, some frames, etc.) I decided that I hated spray paint and would never use it again. The paint was crackling and rippling and making the most horrid mess I had ever seen. What could I possibly be doing wrong? I was following all the blog advice, light coats, letting it dry in between, light sanding to keep the surface ultra smooth, etc. That's it, I was convinced that I was a spray painting failure and nothing would ever change that. Why wasn't I getting that perfect glossy surface that other people seemed to be getting by following that same advice? Despair.
Well, I was reading a post on a decorating blog about painting furniture, and the author mentioned reading the instructions on the back of the can....what a revelation! Apparently, you have to apply the paint within a certain time period (1-24 hours depending on the type of spray paint), and may not reapply again until 2 weeks have passed. So...glad I had this information now, I have already finished painting the Expedit Bookcases and had started on the vintage dressers, and was feeling like they were never going to have the sleek look I was hoping for (No matter how I hand paint, it still doesn't look perfect to my critical eye). The moral of the story for me is, always read directions! I am looking forward to finishing the dressers and sharing the results of my newfound friendship with spray paint.

Friday, August 12, 2011

Bryn's Room Inspiration

I guess I should start with a "Bryn's Room Before" post, but she is napping (harhar, at least she was when I started this post at 1:30pm, now she is in bed for the night, I guess I only get stuff done when the babes are asleep :) ), so I can't take any photos right now. Also, who are we kidding? When we moved in to this house, Her room contained: her crib. Yes, just her crib. We moved from a small two bedroom apartment, so she had no other furniture (as though any of the other rooms did, lol. You saw how Gavin's room looks). So instead of boring you with a post of her room 'before', I'll just barge right into things that are inspiring to me right now.

I just love the colors in this bouquet! Don't they make you feel alive? I would love to use some version of pink/orange for the accent colors in her room, but I want the majority of the room to be neutral, so we can change it if we get tired of it. Photo found here.

Next, I'll show you a version of the bed we bought. The Ikea Meldal bed was my first choice, but as luck (and cheapness) would have it, someone posted the very similar White Ikea Minnen bed on Craigslist for a fraction of the cost of buying it new. What can I say, I'm a sucker for a good deal. I still really like the bed, but I did prefer the impact the other bed would have had in the room, because of it's size. This cute bed is from this blog.

Here is a nicely styled room with two Minnen beds. The second part of what sold me on this Craigslist deal was thinking that Bryn may have to share a room some day, and two Minnen beds would be a much better fit than two of the larger Meldal daybeds. Via

I absolutely LOVE this photo. Love the white dresser, Love the silver mirror/lamps, love the chic effect of all the items together. This is the vibe I want to create, if only I had a bigger budget. (Forgot to save the link, if there was one, sorry!)

A photo like this makes me wonder if I should be painting Bryn's vintage dressers a color other than white? But I love the way the white looks in the photo above, so I'm not won over yet. Found here.

I would really love a beautiful girly fixture like this one, or a lovely vintage chandelier kind of like this, but I do like the look of the Capiz Shell chandeliers. Plus there are lots of great tutorials online for recreating your own for way less money.
I am definitely on board to do some fun DIY wall art, I know I would like to find a cute letter "B" for the wall, we may or may not attempt to do our own "board and batten" (some nice architectural features always make a room feel more expensive to me), Something like this on the bed would be divine, and although it feels like every nursery I see online has pompoms and/or paper lanterns, they are still pretty cute too. Here is one last nursery I love the look and feel of, so feast your eyes.

Friday, August 5, 2011

Gavin's Room: Inspiration

Here are some photos that are inspiring me, while thinking about Gavin's room. Since we decided to buy a house and stay for at least a few years, I figured it's finally time to start decorating! Most of the design blogs I've been reading advise you to gather ideas by saving pictures of rooms you really like. I have been saving photos on my computer and via Pinterest, so I'll share some with you. I want to have several 'boating/beachy' pieces in the room, but I am not looking for a theme room.

I really like this room vibe. It looks like a child friendly space while still being something that will grow with a child. I also like that the main pieces are neutral and the accent pieces carry the color. Find it Here.

I really like the vibe of this room. The colors are probably too bold for my taste, and since we're hoping to re-sell soonish, the striped walls are not going to fly. I love the modern sense the space gives you, and it's still pretty simple. Find it Here.

Would a sailing/beachy theme be complete without wainscoting? I think not. Find it Here.

This is a shirt Gavin has outgrown. If you've ever watched the show "Sarah's House" you know that she likes to start with an 'inspiration fabric' that will guide the room in the direction she wants it to go. I really like the neutral/understated/classic feel of the fabric of this shirt.

Idea for wall art. Find it Here. Wish this fabric were still available, so I could frame a swatch.

If you can, try to ignore the PINK of this room, and just look at the styling of the Ikea Expedit shelf. I found two Expedit shelves on Craigslist, one 2x4 and one 4x4, and I'm hoping to make one or both of them work in Gavin's room, after they're painted white.

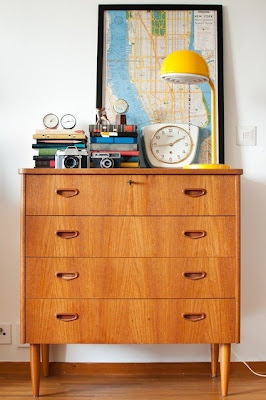
Something I don't have yet: An awesome mod dresser. Find this image Here.

Gavin's Grandma T made this incredible quilt, and it's what started me thinking 'boats/beachy' in the first place, I'm not sure how to display it yet. I don't really think I want it just hanging on the wall, maybe on a quilt rack?

Close up of one of my favorite squares of the quilt.

Gavin's Room: Before (before is an understatement)


I'm almost embarrassed to post photos of Gavin's room. He has one toddler bed and plastic storage drawers...and lots of books/toys. I guess it will make for a very dramatic 'after' reveal when I finally get done. Here are some photos:

The toddler bed has such a tiny footprint in the room, it looks kind of sad (yes the bed is messy, that's because I only bought a sheet that fits, the blanket is a twin and doesn't really fit the bed). You can see some of the paint colors I've tested on the wall.

You can see books and toys in abundance, just begging to have someplace to live.

The cute hanging organizers are from Target, we probably won't need them for this room after Gavin finally gets a dresser.

Getting real - all of those boxes and bags on the floor on the left side of the closet are boy's clothes from 0-3t, I am looking forward to the day when we can get rid of all that baby stuff we have to save! That will solve a lot of storage issues!

Wednesday, August 3, 2011

Do you Pinterest?

I almost wish I hadn't discovered Pinterest...if you don't already use it, it's this great website where you 'pin' or save ideas for whatever you like: house ideas, diy ideas, clothing ideas, places you'd like to go, etc. When you put in a 'pin' you can save the website address where you found the 'thing/place' you like, and have a ready resource for going back to something that has inspired you. Here is a link to some of the things that are inspiring me. It's a great time-waster though too, just like any good internet site, so be prepared to have some time sucked away before you finally get to where you only want to pin things occasionally.
I'm excited for all the things I want to try, especially projects with the house.
Happy Pinning!

Saturday, July 23, 2011

Vintage Dressers, Part 2

Although I bought these dressers more than a month ago, you can see I just posted about them (done with the biggest of the 'yuckies' in my pregnancy and ready to start the blog). Trust me, I am not that 'on the ball' as far as getting projects started goes. The next step in the 'restoration'/making them less ugly process was the hardware. I considered buying new pulls, but I really liked the original drawer pulls, so I decided to keep them. Years of never being polished and taken care of had left them tarnished. Enter: Brasso, which, as it turns out, is great stuff! The project of tarnish removal took longer than I thought it would (I can only think of one or two projects we've taken on that actually took less time we thought they would, or even equal to the time we thought they would). I am very pleased with how they turned out.
Sad and sorry looking pulls above.

Here is a nice contrast shot of a polished (de-tarnished) pull next to the original pull
I alternated between putting the Brasso on with the old sock, and scrubbing them down with the tooth brush. For these very tarnished drawer pulls it took A LOT of Brasso applied several times. I washed them down in the garage utility sink in between applications.

How do I love thee: Vintage Dressers Part 1

I was so excited to find these lovely vintage dressers on Craigslist! Thank goodness for a sweet friend who brought her truck and helped me get them home. Here are some photos of the dressers and the kids enjoying them!
You can see the paint swatches on the walls, thank goodness I finally found a color I love. Also, you can see the rug I bought from Costco and disliked almost as soon as I got it home. Thank goodness the edge started fraying, and I LOVE Costco's return policy (they are pretty much the bomb, return almost any non-electronic items, even months after you bought them).

Friday, July 22, 2011

My To-Do List

If I think too long about all the things I need to get done, I will probably go insane, but I wanted to take just a minute to jot down some of the things that I would like to get done:
1. Paint the Ikea Expedit bookcase I bought for Gavin's room (it is brown/black and I want it to be white).
2. Paint the Ikea Malm dresser in our bedroom (it is birch and I want it white).
3. Paint our kitchen table (it is natural wood/birch color and I think I want it dark brown...undecided).
4. Decide on a paint color for our master, Gavin's room and Bryn's room.
5. Finish the trim paint in the living room/dining room.
6. Touch up the ceiling paint in the living room/dining room
7. Paint the living room/dining room
8. Paint the vintage dressers I bought for Bryn's room

Thursday, July 14, 2011

Bathroom: Part Two

Since the bid for the bathroom remodel came in just over $10K (not including fixtures and tile, etc.). We decided to tackle the project ourselves. Here are some photos in progress of the demolition.Before we removed the old Toilet (above)

Before we removed the old linoleum
The tub wasn't in bad shape, so we decided just to move it while we did the sub floor, then put it back in place.

You can see the rotten part of the sub floor above

Removing the ceiling probably wasn't necessary, we just worried about the extent of the mold, so we wanted to be very thorough.
After removing the bad sub floor, plumbing to move the toilet and vanity, and installing the base for the floor tile (Thank you Handy Hubby and friends).

Bathroom: Part One

Here are some before photos of our bathroom (can you say yuck!)

The vanity started as soon as you walked in the pocket door
It was difficult to walk inside the bathroom, because of the vanity, not to mention that a pocket door was mandatory, because of the space issue.The rotten part of the floor (above)


Super gross around the tub and shower (it's hard to tell from the photos, but the whole bathroom was rotting, when we demo'd the vanity and storage area, the hinges almost fell apart because they were so rusted, not to mention that there was mold behind the mirror)Extra storage space in the corner behind the shower

Wednesday, July 13, 2011

The house!


After searching high and low (and many long discussions about exactly what we wanted, and what we were comfortable paying), we bought 'the' house. We knew we wanted a 'fixer-upper', although that can mean very different things to different people. So, we bought something that needed lots of work, and something that we could put a lot of time (and some money) into improving and (hopefully) selling someday (sooner rather than later, if I get my wish). Here are some photos to enjoy of the 'before' (although I'll call it the before, before; since I know we have a long way to go).
The carpet that had to go, above
The bathroom that the inspector said 'needed renovation' and the floor that was 'not live-able'
(sorry about the small photos, they are from a realty website, here are some more of our own)